Quizzes are a powerful tool for assessing student understanding and progress. As a teacher, you can create custom quizzes, add various types of questions, attach them to lessons, and review student attempts. This guide covers everything you need to know about creating and managing quizzes on the platform.
Emma
Last Update 2025-10-14
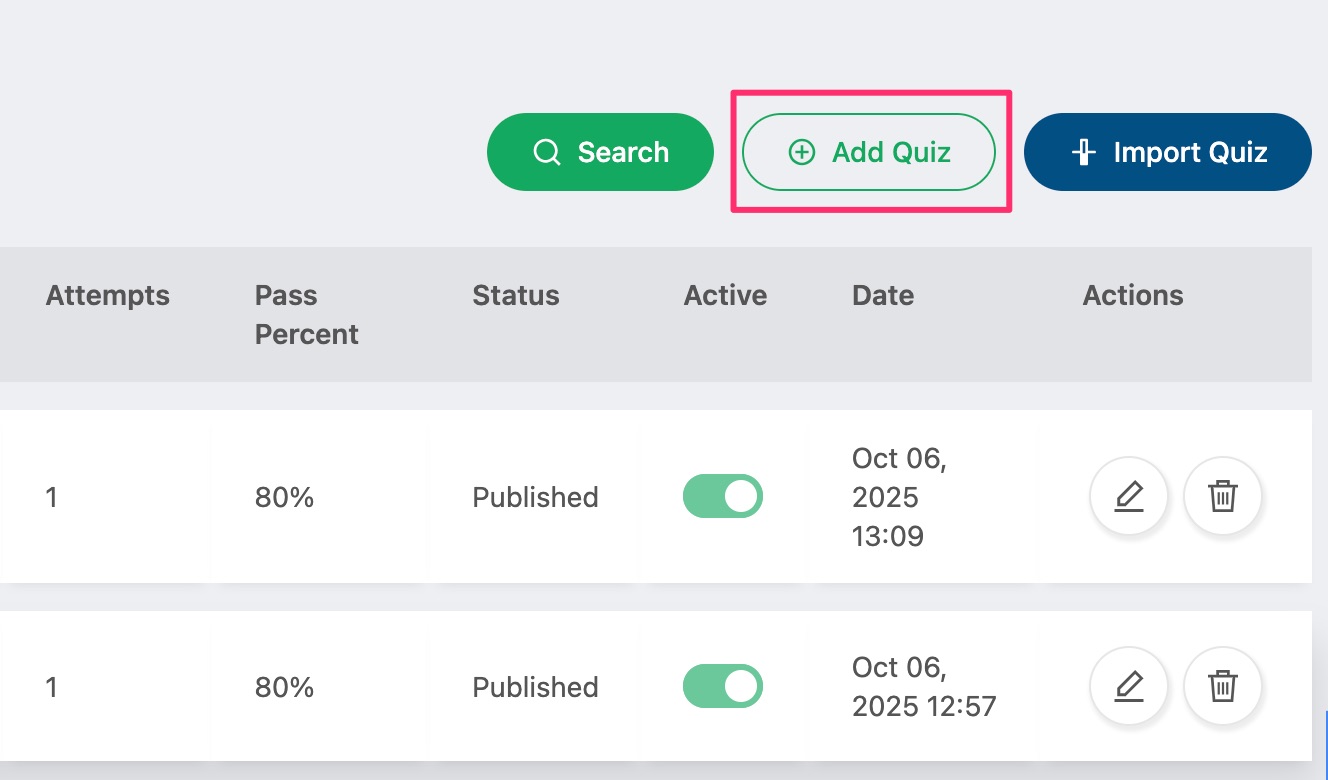
Creating a New Quiz
To create a new quiz:
- Go to your Dashboard
- Navigate to Quizzes in the left menu
- Click the "Add Quiz" button
- Fill in the quiz details form
Importing Quizzes from Other Teachers
Instead of creating quizzes from scratch, you can import quizzes that other teachers have created. This is a great way to save time and access high-quality assessment materials.
How to Import Quizzes
- Go to your Quizzes page in the dashboard
- Click the "Import Quiz" button in the top right corner
- Select a teacher from the dropdown menu
- Browse the list of available quizzes from that teacher
- Select one or more quizzes by checking the boxes
- Click "Import Selected Quizzes" to copy them to your quiz list
Alexander Kolchinsky's Assessment Quizzes
Recommended: Teacher Alexander Kolchinsky has created a comprehensive library of assessment quizzes that are available for import. These quizzes are designed to evaluate student proficiency across different grade levels and topics.
What You Can Import:
- Grade-Level Assessments: Quizzes organized by grade level to test overall math proficiency
- Topic-Specific Assessments: Focused quizzes for specific mathematical concepts
- Pre-Made Questions: All questions and answers are already configured
- Auto-Grading: Most assessment quizzes use single/multiple choice questions that are automatically graded
Important Notes:
- Imported quizzes are copies - you can edit them without affecting the original
- You can modify questions, add new ones, or adjust settings after importing
- The imported quiz becomes part of your quiz library and can be attached to any of your lessons
- Changes you make to imported quizzes won't affect other teachers who import the same quiz
Quiz Details Form
When creating a quiz, you'll need to provide the following information on 3 wizard pages:
Wizard Page 1 (General):
- Quiz Title - A descriptive name for the quiz (e.g., "Algebra 1 - Chapter 3 Test") (Title must be between 10 and 120 characters long)
- Grade Level - Select the appropriate grade level (e.g., Grade 8, Grade 10, etc.)
- Quiz Type:
- Quiz TypeAuto-Graded - For quizzes with only single choice and multiple choice questions that are automatically scored
- Non-Graded - For quizzes that include text questions requiring manual review
- Instructions (optional) - Provide any special instructions or context for students
Wizard Page 2 (Question Bank):
- Add Questions to the Quiz (at least one question needs to be added/attached to the quiz)
Wizard Page 3 (Quiz Settings):
- Duration - Enter the number of minutes alotted for quiz taking (default: 60 minutes)
- No of Attempts Allowed - Set how many times students can retake the quiz (1, 2, 3, or unlimited, default: 1)
- Pass Percentage - Set minimum score percentage for a passing grade (default: 70%)
- Validity - Set number of hours the student has to take the quiz before it is set to expired (default: 48 hours)
- Fail Message - Set message string to show on the quiz result page when score is below Pass Percentage
- Pass Message - Set message string to show on the quiz result page when score is at or above Pass Percentage.
Choosing the Right Quiz Type
Auto-Graded Quizzes:
- Best for: Objective questions with clear right/wrong answers
- Question types allowed: Single choice and multiple choice only
- Scoring: Automatic - students see their score immediately
- Your role: Review the attempt at class time
Non-Graded Quizzes:
- Best for: Open-ended questions, essays, problem-solving that requires work shown
- Question types allowed: Text questions (and optionally choice questions)
- Scoring: Manual - you review and provide feedback
- Your role: Review all answers and mark as Completed
Tip: If your quiz will include any text questions that require manual review, choose "Non-Graded" as the quiz type.
Adding Questions to a Quiz
After creating a quiz, you need to add questions to it. There are two ways to do this:
Method 1: Attach Existing Questions
- Open your quiz from the quiz list
- Click "Add Questions" button
- Search for questions by title, subject, or type
- Check the boxes next to the questions you want to add
- Click "Attach"
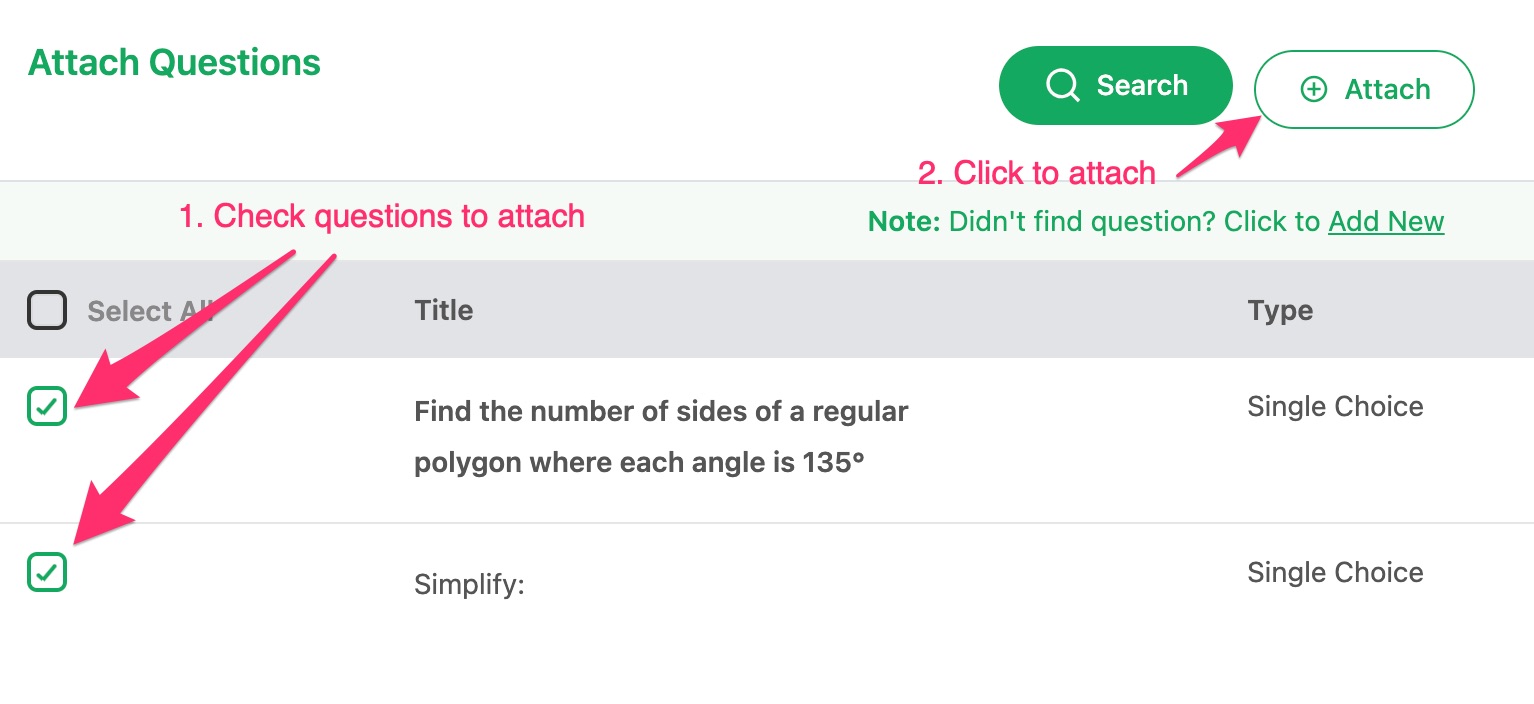
Tip: Creating a question bank of reusable questions saves time when creating multiple quizzes. You can use the same question across different quizzes.
Method 2: Create New Questions while Attaching
- Open your quiz from the quiz list, fill out the 1st wizard page, and then, go to the 2nd wizard page (Question Bank)
- Click "Add Questions"
- Click "Add New" on the Attach Questions screen (where it says: Note: Didn't find question? Click to Add New)
- Choose the question type (Single Choice, Multiple Choice, or Text)
- Fill in the question details
- Click "Save"

Creating Different Question Types
Single Choice Questions
Single choice questions have one correct answer. When creating this type of question:
- Enter your Question Title (this is what students will see). Title will appear at the top of the quesiton and in the questions list.
- Optionally add Question Image and crop it using the cropper tool
- Optionally add Question Text that will appear after the Question Image
- Add Answer Options - click "Add Option" for each possible answer
- Mark one option as correct by checking the "Correct Answer" checkbox
Example:
Question: What is the value of x in the equation 2x + 5 = 13?
Options:
○ x = 3
○ x = 4 ✓ (Correct)
○ x = 5
○ x = 6
Explanation: To solve: 2x + 5 = 13, subtract 5 from 13 to get 2x = 8, then divide by 2 to get x = 4.
Note: You can use either the π or the fx buttons in the toolbar to type in the special character or the LaTEX formula, respectively.
Multiple Choice Questions
There are two types of multiple choice questions:
1. Multiple Choice (must pick all correct)
- Students must select ALL correct answers to get credit
- If they miss any correct answer or select any wrong answer, they get zero points
- Use for questions where identifying all correct options is important
2. Multiple Choice (any correct answer gets credit)
- Students get credit for selecting any correct answer(s)
- Partial credit is awarded based on how many correct answers they select
- More forgiving - rewards partial knowledge
When creating multiple choice questions:
- Enter your Question Title
- Add Answer Options
- Mark correct answer(s) by checking their "Correct Answer" checkbox(es)
Example:
Multiple Choice (must pick all correct) Question: Which of the following numbers are prime? (Select all that apply)
Options:
☑ 7 ✓ (Correct)
☐ 9
☑ 11 ✓ (Correct)
☐ 15
☑ 13 ✓ (Correct)
Explanation: Prime numbers are divisible only by 1 and themselves. 7, 11, and 13 are prime. 9 (3×3) and 15 (3×5) are composite.
Important: Students must select ALL correct answers to get the question right. Partial credit is not given for multiple choice questions.
Text Questions
Text questions allow students to type written answers. Important: Text questions can ONLY be used in Non-Graded quizzes.
Text questions are ideal for:
- Showing work for math problems
- Explaining concepts in their own words
- Short essays or paragraphs
- Describing problem-solving steps
How Text Questions Work:
- Students type their answer in a text box
- There is no automatic grading - you must manually review and grade each answer
- Best used when you want to see student reasoning and understanding
When creating a text question:
- Enter your Question Title
- Enter the Question Text with any instructions
- Save the question
Note: If you try to add a Text question to an Auto-Graded quiz, you will get an error. Text questions require manual grading.
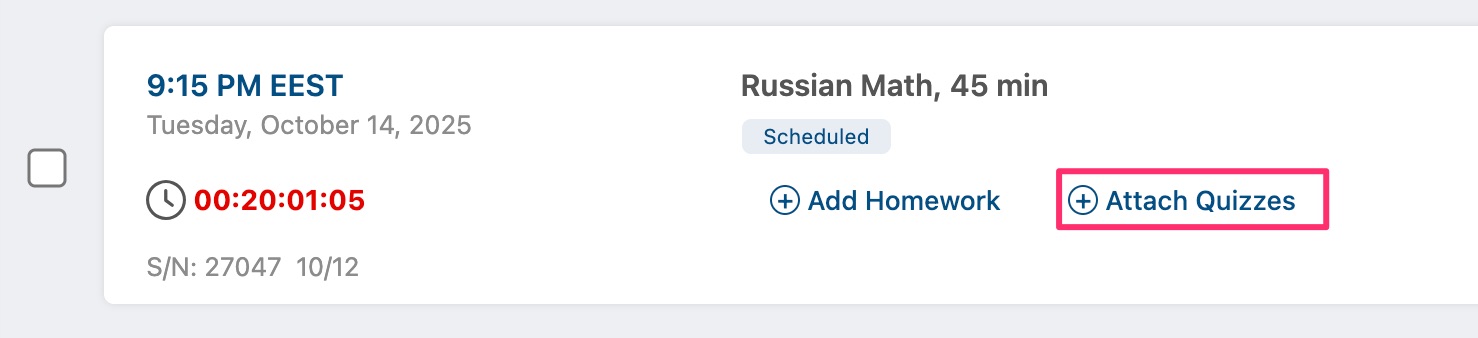
Attaching Quizzes to Lessons
Once you've created a quiz and added questions, you can attach it to any lesson. You can attach as many quizzes as you would like to a single lesson:
- Go to your Lessons page in the dashboard
- Find the lesson you want to attach a quiz to
- Click the "Attach Quiz" button on the lesson card
- Select the quiz from the list
- Click "Attach" to confirm
- Email will be sent to the student with the link to the lesson, directing the student to start taking the quiz.
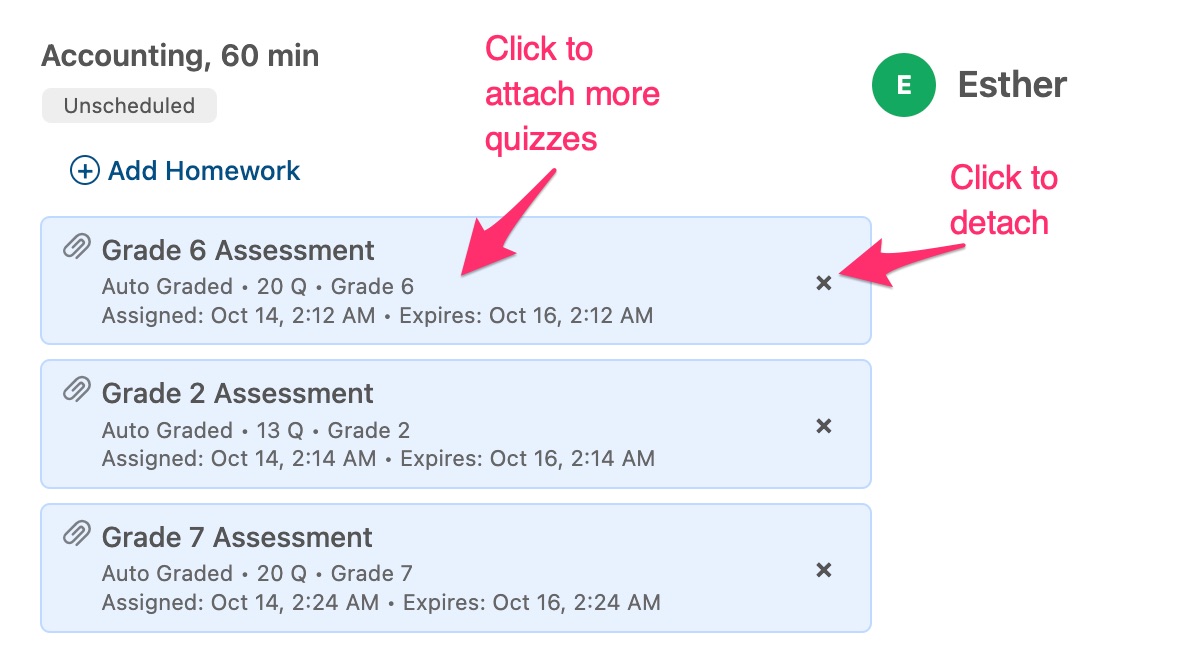
Once attached, the quiz will appear on the student's lesson card with all relevant information (title, type, questions, grade level, and attempt status).
Tip: You can attach the same quiz to multiple lessons. This is useful if you want to assess the same concepts across different students or lesson sessions.
Note: There is no need to send the quiz link directly to the student, since an automated email will be sent by the system.
On the lesson card, click any attached quiz (blue rectangle) to attach more quizzes, or the x button to detach the quiz from the lesson.
Attaching Quizzes to Group Class Lessons
Quizzes can also be attached to group class lessons. The process is similar to attaching quizzes to individual lessons, but with some important differences:
- Go to your Lessons page in the dashboard
- Find a group class lesson (identified by the "GROUP CLASS" badge)
- Click the "Attach Quiz" button on the lesson card
- Select the quiz from the list
- Click "Attach" to confirm
Key Differences for Group Class Quizzes:
- Automatic Distribution: When you attach a quiz to a group class lesson, the quiz is automatically assigned to ALL students enrolled in that group class
- Student Notifications: All enrolled students receive email notifications about the new quiz attachment
- Individual Results: Each student completes the quiz individually and receives their own score
- Bulk Management: You can view and grade all student attempts from a single location
Note: If you detach a quiz from a group class lesson, all student attempts for that quiz will be removed. Make sure to download or review results before detaching if needed.
Managing Quiz Questions
After adding questions to a quiz, you can manage them:
Editing Questions
- Open your quiz from the quiz list
- Find the question you want to edit
- Click the "Edit" button (pencil icon)
- Make your changes
- Click "Save"
Note: When you edit a question, changes appear in your question bank immediately. However, students who have already been assigned a quiz see the version that existed when the quiz was assigned to them (the system uses snapshots to preserve quiz integrity).
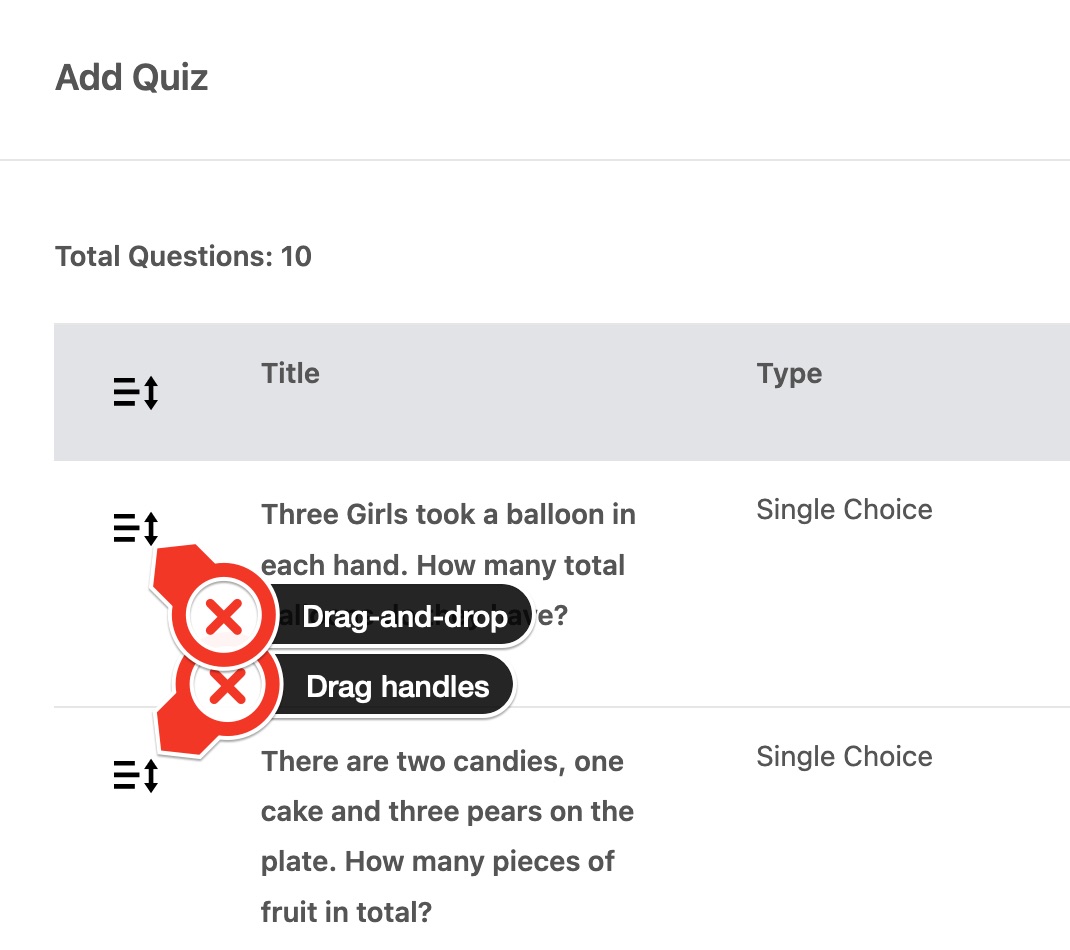
Reordering Questions
To change the order of questions in a quiz:
- Open your quiz
- Use the drag handle (≡ icon) on the left of each question
- Drag questions up or down to reorder them
- Changes are saved automatically
Removing Questions
To remove a question from a quiz:
- Open your quiz
- Find the question you want to remove
- Click the "Delete" button (trash icon)
- Confirm the deletion
Note: Removing a question from a quiz doesn't delete the question from your question bank. It only removes it from this specific quiz.
Reviewing Student Quiz Attempts
When students submit quiz attempts, you'll need to review and evaluate them. Here's how:
Finding Quiz Attempts to Review
- Go to Dashboard → Quiz → Quiz Results
- You'll see a list of all quiz attempts that need your review
- Filter by student, quiz, or date to find specific attempts
- Attempts marked as "Pending Review" need your attention
Reviewing Auto-Graded Quiz Attempts
For auto-graded quizzes (only single choice and multiple choice questions):
- The quiz is automatically graded when the student submits it
- Pass/Fail status is automatically determined based on your pass percentage setting
- Students see their results immediately after submission
- You receive an email notification when a student completes the quiz
To review an auto-graded attempt:
- Go to Dashboard → Quiz Results
- Click "View" on the quiz attempt
- You'll see:
- The student's overall score (already calculated)
- Pass/Fail status (already determined)
- Each question with the student's answer
- Correct answers highlighted in green
- Incorrect answers highlighted in red
- Skipped questions highlighted in yellow
No manual grading required - the system handles everything automatically for auto-graded quizzes.
Reviewing Non-Graded Quiz Attempts
For non-graded quizzes (containing text questions):
- Click "Review" on the quiz attempt
- For each question, you'll see:
- The question text
- The student's written answer
- Review each answer carefully
- Provide feedback for each question:
- Mark correct/incorrect (for choice questions)
- Write detailed comments (for text questions)
- Give suggestions for improvement
- When you've reviewed all questions, click "Mark as Completed"
- Click "Save Review"
Tip: Provide constructive feedback on text questions. Explain what the student did well and where they can improve. This helps them learn from their mistakes.
Understanding Quiz Attempt Statuses
Quiz attempts can have different statuses:
- Not Started - Student hasn't begun the quiz yet
- In Progress - Student saved progress but hasn't submitted
- Pending Review - Student submitted, waiting for your evaluation
- Passed - You marked the attempt as passed (shows percentage)
- Failed - You marked the attempt as failed (shows percentage)
- Completed - You finished reviewing a non-graded quiz
Note about Expired Quizzes:
When a quiz's deadline has passed, students will no longer be able to start it or retake it. The system displays an error message: "Access to expired quiz is not allowed" or "Retake on expired quiz is not allowed."
Important points about expired quizzes:
- The expiration is determined by the quiz's validity deadline date
- Only applies to standalone quizzes attached to lessons (quizzes assigned through courses or assessments don't expire)
- The database status (Not Started, In Progress, or Completed) remains unchanged when a quiz expires
- You can extend the deadline in the quiz settings to allow students to access it again
Understanding Quiz Time Restrictions:
There are two different time-based restrictions in the quiz system:
1. Expiration Date (Deadline to START the quiz):
- This is the validity deadline that determines when a quiz becomes unavailable to start or retake
- Only applies to standalone quizzes - does NOT apply to quizzes attached to courses or assessments
- Students will see an error: "Access to expired quiz is not allowed" or "Retake on expired quiz is not allowed"
- You can extend the deadline in quiz settings to allow students to access it again
2. Time Limit (Time to COMPLETE the quiz once started):
- This is the duration that determines how long students have to complete a quiz after they start it
- Applies to ALL quiz types - including standalone quizzes, course quizzes, AND assessments
- Once started, students will see a countdown timer showing remaining time
- When the timer reaches zero, the quiz is automatically submitted
- Students will see a warning notification shortly before time expires
- This ensures fair time limits for all quiz types, including assessments
Managing Quiz Attempts and Retakes
Viewing Attempt History
To see all attempts by a specific student:
- Go to Quiz Results
- Filter by the student's name
- You'll see all their attempts in chronological order
- Click on any attempt to view the details
Editing Quiz Settings
To modify quiz settings after creation:
- Go to your Quizzes page
- Find the quiz you want to edit
- Click the "Edit" button (pencil icon)
- Modify any settings (title, subject, grade level, attempts, etc.)
- Click "Save Changes"
Note: Quiz type (Auto-Graded vs Non-Graded) cannot be changed once the quiz is created. Choose carefully when creating your quiz!
Deleting Quizzes
To delete a quiz:
- Go to your Quizzes page
- Find the quiz you want to delete
- Click the "Delete" button (trash icon)
- Confirm the deletion
Note: Deleting a quiz removes it from your list and prevents new assignments. Student quiz attempts are preserved and can still be viewed in Quiz Results.
Best Practices for Creating Effective Quizzes
Question Writing Tips
- Be clear and specific - Avoid ambiguous wording
- Use proper terminology - Match the vocabulary level to your students
- Avoid tricks - Test understanding, not reading comprehension
- Provide context - Include necessary information in the question
- Check for errors - Review spelling, grammar, and calculations
Answer Options Tips
- Make options similar in length - Don't make the correct answer obviously longer/shorter
- Avoid "all of the above" - This can be confusing for students
- Use plausible distractors - Wrong answers should be reasonable but incorrect
- Mix up correct answer positions - Don't always put the right answer in the same spot
Quiz Design Tips
- Start easy, get harder - Build confidence with easier questions first
- Group similar questions - Keep related questions together
- Limit quiz length - 10-20 questions is usually ideal
- Set appropriate attempts - Consider 2-3 attempts for learning quizzes
- Test one concept per question - Don't make questions overly complex
What Teachers Can Do with Student Quiz Attempts
As a teacher, you have several tools for managing and reviewing student quiz attempts:
Resetting Student Quiz Attempts
While there is no direct "Reset Attempts" button, teachers can effectively reset a quiz for all students by detaching and reattaching the quiz from the lesson or class:
- Go to your scheduled lesson or class where the quiz is attached
- Click "Detach" to remove the quiz (this will cancel any in-progress attempts)
- Click "Attach Quiz" to reattach the same quiz
- Students will now see a fresh quiz with no previous attempts
Important: Detaching a quiz from a lesson or class will delete all student attempt records for that quiz. This action cannot be undone, so use it carefully. This is useful when:
- Students experienced technical problems during the quiz
- You want to give all students a fresh start
- The quiz was accidentally assigned too early
View Quiz Results
- Go to Dashboard → Quiz Results to see all student quiz attempts
- Filter by date range, student name, or grade level
- See scores, completion status, and attempt details
Review and Grade Text Responses
For quizzes with essay or text-entry questions:
- Access the Quiz Review interface from the Quiz Results page
- Read student text responses
- Assign points for each text question
- Add feedback comments
- Submit the grading to calculate final scores
Monitor Student Progress on Lesson Cards
Quiz status appears directly on lesson cards in your scheduled lessons view:
- Not Started - Student hasn't begun the quiz
- In Progress - Student is currently taking the quiz
- Completed - For non-graded quizzes
- Passed (score%) - Student passed with their score
- Failed (score%) - Student did not meet the passing threshold
- Pending Review - Quiz needs manual grading
Student Retakes
Students can retake quizzes themselves through the quiz interface, as long as they haven't exceeded the maximum number of attempts you set when creating the quiz. Teachers cannot manually reset student attempts - the system enforces the attempt limits automatically.
If a student needs additional attempts beyond what you originally allowed:
- You can create a new quiz assignment for that student with the same quiz
- Or adjust the maximum attempts setting before the student uses all their attempts
Common Questions
Can I copy a quiz to use with different students?
Yes! You can attach the same quiz to multiple lessons. This allows you to reuse quizzes while tracking results separately for each student.
What happens if I edit a question after students have taken the quiz?
Editing a question affects how it appears for future attempts, but doesn't change previous submissions. Student answers are stored as submitted, so their attempt history remains accurate.
Can I set a time limit for quizzes?
Currently, time limits are not available. However, you can include timing expectations in the quiz instructions and monitor when students start and submit their attempts.
How do I give partial credit for a question?
Auto-graded questions (single choice and multiple choice) don't support partial credit - answers are either correct or incorrect. For partial credit, use text questions and manually assign points when reviewing.
Can students see their quiz results immediately?
For auto-graded quizzes, students can see their score and which questions they got right/wrong immediately after submission. However, the final "Passed" or "Failed" status appears only after you complete your review. For non-graded quizzes, students must wait for your full review before seeing any results.
What if a student reports a technical issue during a quiz?
If a student experiences technical problems during a quiz (browser crash, internet disconnection, etc.), you have several options:
1. Review Their Progress
- Go to Quiz Results
- Find the student's in-progress attempt
- Click "View Details" to see which questions they completed before the issue
- This helps you understand the scope of the problem
2. Let Them Continue
For quizzes attached to lessons or classes:
- The quiz remains active until the validity period expires
- Students can return to their in-progress attempt and continue where they left off
- Their previous answers are saved automatically
3. Reset the Quiz for All Students Taking the Lesson (Detach/Reattach)
If the technical issue affected the quiz significantly or you want to give everyone a fresh start:
- Go to the lesson or class where the quiz is attached
- Click "Detach" to remove the quiz
- Click "Attach Quiz" to reattach the same quiz
- All students will get a fresh attempt with no previous data
Important: This resets the quiz for all students taking the lesson, not just the one who had the issue. Use this option when you want everyone to start over.
4. For Course Quizzes
Course quizzes don't have validity periods and students can retake them according to the attempt limit you set. If they haven't exhausted their attempts, they can start a new attempt after the technical issue is resolved.
Getting Help
If you need assistance with quizzes:
- Check this help article for detailed instructions
- Contact platform support for technical issues
- Reach out to other teachers in the community for best practices
🤝 Need Additional Support?
Our comprehensive help documentation and support team are here to assist you.